Description
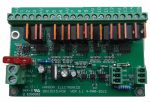
The Baldrick 8 port pixel controller is high performance, low cost and good looking controller designed by iLightThat in the UK.
The Baldrick 8 ready to run (Baldrick8-RTR) has the following
- Baldrick 8 output pixel controller
- 290 x 190 x 140 waterproof enclosure with mounting feet included
- 8 40cm pixel pigtails in either Xconnect or 13.5mm/Ray Wu style with cable numbers 1-8 on the pigtails
- 1 waterproof bulkhead mount RJ45 connector for the ethernet connection to Baldrick
- cable gland for installing the mains power cable through.
Power options
- no power supply supplied.
- 12V 5A 60W 110-240V power supply . Fuses not installed. This configuration would be used when powering pixels from another power source
- 5V 200W 110-240V power supply. 5A fuses should replace the default 7.5A fuses
- 12V 500W 240V waterproof power supply. The power supply is supplied screwed to the enclosure. 5A fuses should replace the default 7.5A fuses
5V 400W 110/240 switchable power supply. Power supply and 2 vents are supplied but not fitted. A fan is required but not supplied.This option is no longer available. Order a power supply and vents separately if desired.
Baldrick was the faithful servant of fictional tv character Edmund Blackadder from the 4 seasons of Blackadder as well as several specials. The board, settings and the documentation borrow some of the legendary humour from the classic tv show.
The controller has it’s own firmware and doesn’t rely on a Raspberry Pi or Falcon Player (FPP)
The Baldrick Board will output up to 750 WS281x pixels @ 40fps per port.
The Baldrick Board has two 30amp power inputs (5-24v DC) and the board will run from either input! The 2 30A rated inputs allows 7.5amp outputs across all 8 outputs
3 inputs with buttons to trigger remote webhooks and/or activate onboard functions (FPP actions etc)
Fuse-good indicator lights for easy problem-finding
Wired 100Mb ethernet for minimal network delay
Direct integration with xlights versions 2024.10 and later. (Vendor- iLightThat, Model- Baldrick)
Conformal coating over front of the pcb to reduce the chance of damage from condensation or precipitation
QR code on the pcb which links directly to the baldrickboard website
You can read more about the controller here: https://baldrickboard.com
On initial connection and setting up the Baldrick controller MUST be connector to a router connected to the internet. On it’s initial connection it will do a quick (30s) update. The board MUST be connected to a router to assign an IP address via DHCP each time until a static IP address is assigned. When connected to a router the board can be accessed via http://baldrickboard.local in a browser.
An unboxing and setup video of the Baldrick Board controller by Greg at PanelsRUs . There’s lots of changes since this video.


