


Description
THIS PAGE AND THE MANUAL LINKED ARE WORKS IN PROGESS.
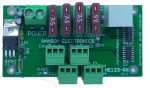
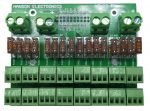
The HE123D is a pixel board based on the single board computer BeagleBone Black (BBB). A Beaglebone Green (BBG) can be used instead of a BBB. The HE123D uses design elements of the RGB123 48 output pixel board that can be controlled with Falcon Player (FPP). The HE123D is the motherboard that the BBB/BBG plugs into.
The HE123D ready to run (HE123D-RTR) has the following
- HE123D with BBG and 16GB micro SD card with FPP7.5 installed and partially configured. The installed version may change.
- 290x190x140 waterproof enclosure with mounting feet included
- 12V 5A 60W 110-240V power supply
- 12 waterproof bulkhead mount RJ45 connectors for the 48 differential pixel outputs
- 1 waterproof bulkhead mount RJ45 connector for the ethernet connection to the BBG
- 4 hole cable gland for installing the mains power cable through and also for connecting to the user inputs in desired.
- Map of connection positions attached to inside of the box lid.
NOTE: Some photo show no Beaglebone Green installed in place. The Beaglebone Green is installed.
Under Falcon Player (FPP) version 4.x and later the maximum pixels per output are 800 per output at 40fps and 1600 at 20fps. This gives a maximum number of pixels of 38,400 at 40fps or 76,800 at 20fps. That’s with all 48 ports fully loaded.
An incomplete/ in progress manual is at HE123-User-Manual-V1.5-early-draft.pdf
When setting up under Xlights there is now a number of features that allow easier integration.
On the controllers tab there’s effectively 7 steps to add a HE123.
- Add an Ethernet.
- Add Hanson Electronics as the Vendor
- Select HE123D
- Assign a static IP or set to multicast or a static IP. Static IP is better.
- Select DDP as the protocol. E1.31 can/could also be selected.
- Select the start universe/s
- Save
Receiver boards to suit.
HE123-RX2 4 channel RS422 to pixel receiver
-RJ45 connector to 4 channels powered, buffered pixel outputs
PSdiff4 4 channel RS422 to pixel receiver
-RJ45 connector to 4 channels powered, buffered pixel outputs. Mounts direct to 12V server power supply and has 4 pixel outputs and 4 power injection outputs
PSdiff8 8 channel RS422 to pixel receiver
-RJ45 connector to 8 channels powered, buffered pixel outputs. Mounts direct to 12V server power supply and has 8 pixel outputs
PS1diff4 4 channel RS422 to pixel receiver
-RJ45 connector to 4 channels powered, buffered pixel outputs. Mounts direct to power supply and has 4 pixel outputs and 4 power injection outputs. The PS2diff4 has the opposite order of V- and V-.
The HE123D can be used to control Falcon Smart remotes.
The HE123D ready to run controller will either come with an installed eeprom licence or the number will be emailed to you.
From FPP6 a licence from Falcon Christmas is required to get the full functionality of the board. Without this each output is limited to 50 pixels. The licence can be purchased at the link below and instructions on how to install it are on the link after that. It’s a one time purchase and once installed is stored on the eeprom of the controller, so even if you reimage the FPP installation it’ll still be valid on that board.
https://shop.falconplayer.com/product-category/licensekeys/ The 48 port key is $USD30.
https://shop.falconplayer.com/2022/04/28/howto-eeprom-signing/
IF FPP doesn’t detect an eeprom image indicating the cape type an eeprom image can be created from